
I wanted to spruce up my mantle and have it decorated for the 4th of July. So I came up with a couple fun projects. I really like having a holiday themed banner hanging on the mantle, so here is a fun one with some sparkly red white and blue stars.
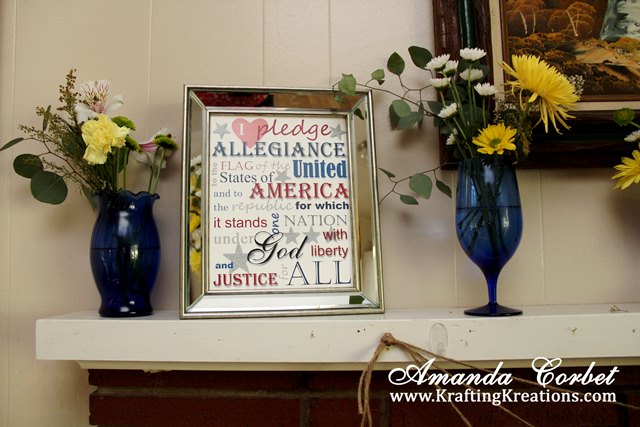
Sadly the grocery store didn't have any red and white bouquets that were inexpensive. Red and white flowers would have really made my mantle patriotic for this photo! But the yellow ones are pretty and add some sunshine indoors. I love having fresh flowers in the house.


Don't they look cute?

5. Now use the smallest Stars framelit to die cut the Red Glimmer Paper. Use a Stampin' Dimensional to stick the red glimmery star into the center of the White/Navy star. Repeat with the remaining nine White/Navy stars.

6. Use the 4th from smallest Star Framelit to die cut the Night of Navy card stock pieces. Place the star inside a box with the Stars decorative mask on top. Spritz with Vanilla Shimmer Smooch Spritz. Repeat on the remaining Night of Navy stars and allow it to dry.


8. Now cut your twine to the desired length. I don't remember at the moment what the lengths are that I cut my twine, but I will come back later to update that little tidbit of information.


10. Then simply tie the ends of the twine into a knot and hang it up on your mantle!

Don't you just love it when a project turns out exactly how you envisioned it? That was this one for me! I think it took about an hour and a half to put this all together. If you decide not to do the piercing it goes faster. But those pierced borders are the perfect detail to dress up those stars!

Sadly the grocery store didn't have any red and white bouquets that were inexpensive. Red and white flowers would have really made my mantle patriotic for this photo! But the yellow ones are pretty and add some sunshine indoors. I love having fresh flowers in the house.
I also made this fun Pledge of Allegiance printable and popped it into a mirrored 8" x 10" frame. I remember saying this every morning when I was in elementary school. If you want one of these fun printables for yourself but don't want to fiddle around with all that text then hop on over to my store and get one that is ready to print and pop into a frame.
Now on to the banner tutorial! Here is what you'll need...
- (6) Real Red card stock 5-1/4" x 5-1/4"
- (5) Night of Navy card stock 4-1/4" x 4-1/4"
- (16) Whisper White card stock 3-1/4" x 3-1/4"
- (5) Real Red card stock 2-1/2" x 2-1/2"
- (6 Dazzling Diamonds glimmer paper 2-1/2" x 2-1/2"
- (5) Dazzling Diamonds glimmer paper 1-1/2" x 1-1/2"
- (10) Red glimmer paper 1-1/2" x 1-1/2"
- Ink: Night of Navy
- Accessories: Hearts & Stars decorative mask, Dots & Stripes decorative mask, Stars Framelits, Stampin' Dimensionals, Sponge Daubers, Vanilla Shimmer Smooch Spritz, twine, Cherry Cobbler reinker, Stampin' Spritzer, rubbing alcohol, Stampin' Pierce Mat, Paper Piercing Tool, Eclectic Piercing Pack
1. Die cut the six large pieces of Real Red card stock in the Big Shot with the largest Stars Framelit. Fill a Stampin' Spritzer with 25 drops Cherry Cobbler ink and fill the remainder of the spritzer with rubbing alcohol. Now lay your star in a box and place the stripes decorative mask on top and spritz a few times. Remove the mask, set the star aside to dry, and repeat until all your red stars have stripes. Once they dry they are subtle, but a nice detail.
2. Use the 3rd from smallest Star Framelit to die to cut the Whisper White card stock. For now you will only need 6 of these. Set aside the rest. Use glue stick to glue a Whisper White star into the center of the red striped stars. Now use your Stampin' Pierce Mat, Paper Piercing tool, and Eclectic Piercing Template to add a row of pierced dots around and inside the Whisper White star. Repeat on the remaining five red stars.
3. Use the 2nd from smallest Star framelit to die cut the larger pieces of Dazzling Diamonds glimmer paper. Stick the glittery stars inside the Whisper White stars with a Stampin' Dimensional.
4. Now take the rest of your Whisper White stars. Use the Stars decorative mask with a Sponge Dauber and Night of Navy ink to dab some navy stars onto the star die cut. Repeat with the remaining nine stars.
Don't they look cute?
5. Now use the smallest Stars framelit to die cut the Red Glimmer Paper. Use a Stampin' Dimensional to stick the red glimmery star into the center of the White/Navy star. Repeat with the remaining nine White/Navy stars.
6. Use the 4th from smallest Star Framelit to die cut the Night of Navy card stock pieces. Place the star inside a box with the Stars decorative mask on top. Spritz with Vanilla Shimmer Smooch Spritz. Repeat on the remaining Night of Navy stars and allow it to dry.
7. Die cut the small pieces of Real Red card stock with the 2nd from smallest Stars Framelit and use the Stampin' Pierce Mat, Paper Piercing Tool, and Eclectic Piercing Pack to pierce a row of dots inside the red star. Die cut the small pieces of Dazzling Diamonds Glimmer Paper with the smallest Stars Framelit. Glue the Dazzling Diamonds star inside the Real Red star. Now stick this layered star onto the Night of Navy star with a Stampin' Dimensional. Repeat to finish the four remaining Night of Navy stars.
9. Use a hot glue gun to glue the twine onto the backsides of the stars. But make sure that you glue the twine on closer to the top of the star. If you glue it right in the middle the stars will want to flip around to the backside
(ask me how I know...). And that is no fun after putting all that work into the front side of the stars.
10. Then simply tie the ends of the twine into a knot and hang it up on your mantle!
Don't you just love it when a project turns out exactly how you envisioned it? That was this one for me! I think it took about an hour and a half to put this all together. If you decide not to do the piercing it goes faster. But those pierced borders are the perfect detail to dress up those stars!
Have you been working on anything fun to add some patriotic colors to your decor before the 4th of July? I've got one more patriotic project planned for this year that I hope to have up next week!
Linking up at these fabulous parties:
Take a Look Tuesday at Sugarbee Crafts
Create Link Inspire at The Crafty Blog Stalker
Inspire me Monday at My Uncommon Slice of Suburbia
Patriotic Categorically Crafting at Someday Crafts
Lou Lou Girls Fabulous Party at Lou Lou Girls
Your Whims Wednesday at My Girlish Whims
Wow Me Wednesday at Ginger Snap Crafts
